
Step 1- Create database table
Create table in database .
CREATE
TABLE OBEE11G_PROXY_ACTAS
(
PROXY_USER_ID VARCHAR2(30 BYTE) NOT NULL ,
PROXY_TARGET_ID VARCHAR2(30 BYTE) NOT NULL ,
PROXY_LEVEL VARCHAR2(10 BYTE) NOT NULL ,
CONSTRAINT OBEE11G_PROXY_ACTAS_PK PRIMARY KEY ( PROXY_USER_ID , PROXY_TARGET_ID )
ENABLE
) ;
PROXY_USER_ID : ID of the proxy user
PROXY_TARGET_ID : ID of the target user
PROXY_LEVEL : Proxy level (either full or restricted). A Restricted level gives you only a read access. (Note:Proxylevel value is case sensitive and must be all lowercase.)
PROXY_TARGET_ID : ID of the target user
PROXY_LEVEL : Proxy level (either full or restricted). A Restricted level gives you only a read access. (Note:Proxylevel value is case sensitive and must be all lowercase.)
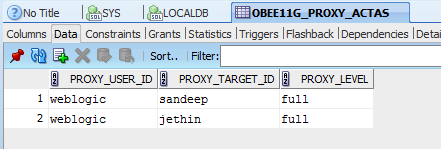
Step 2- Insert the data
You can add more user to the table.The target users should be also created in weblogic using EM.
Step 3- Import table to RPD

Step 4: Create Session Variables
SESSION VARIABLE NAME : PROXY
INIT BLOCK NAME : PROXY_BLOCK
SELECT
PROXY_TARGET_ID
FROM
OBEE11G_PROXY_ACTAS
WHERE UPPER(PROXY_USER_ID) = UPPER(':USER')
AND UPPER(PROXY_TARGET_ID) = UPPER('VALUEOF(NQ_SESSION.RUNAS)')

SESSION VARIABLE NAME : PROXYLEVEL
INIT BLOCK NAME : PROXY_LEVEL_BLOCK
SELECT PROXY_LEVEL
FROM OBEE11G_PROXY_ACTAS
WHERE UPPER(PROXY_TARGET_ID) = UPPER('VALUEOF(NQ_SESSION.RUNAS)')
AND UPPER(PROXY_USER_ID) = UPPER('VALUEOF(NQ_SESSION.RUNASORIGUSER)')

Step 5-Creating a Custom Message Template for Proxy Functionality
You need to create a custom message template for the proxy functionality that contains the SQL to:
Get the list of target users that a proxy user can act as. This list appears in the User box in the Act As dialog box.
Verify whether the proxy user can act as the target user.
Get the list of proxy users that can act as the target user. This list appears on the target user’s My Account screen.
In this step create “LogonParamSQLTemplate.xml” file and place it under “<Middleware Home>\Oracle_BI1\bifoundation\web\msgdb\customMessages”
Note : If you dont find the folder ‘customMessages’ , then create create folder with the name ‘customMessages’ and place the ‘LogonParamSQLTemplate.xml’ file .
In my case the content of ‘LogonParamSQLTemplate.xml is’
<WebMessageTables xmlns:sawm="com.siebel.analytics.web.messageSystem">
<WebMessageTable system="SecurityTemplates" table="Messages">
<WebMessage name="LogonParamSQLTemplate">
<XML>
<logonParam name="RUNAS">
<!-- for EXECUTE PHYSICAL CONNECTION POOL, SQL_Paint.SQL_Paint = -->
<!-- SAS Repository physical_dbname.conn_pool_name -->
<getValues>EXECUTE PHYSICAL CONNECTION POOL "Oracle Data Warehouse"."CP_Proxy"
select PROXY_TARGET_ID from OBEE11G_PROXY_ACTAS where PROXY_USER_ID='@{USERID}'
</getValues>
<verifyValue> EXECUTE PHYSICAL CONNECTION POOL "Oracle Data Warehouse"."CP_Proxy"
select PROXY_TARGET_ID from OBEE11G_PROXY_ACTAS where PROXY_USER_ID='@{USERID}' and PROXY_TARGET_ID='@{VALUE}'
</verifyValue>
<getDelegateUsers>EXECUTE PHYSICAL CONNECTION POOL "Oracle Data Warehouse"."CP_Proxy"
select PROXY_USER_ID, PROXY_LEVEL from OBEE11G_PROXY_ACTAS where PROXY_TARGET_ID='@{USERID}'
</getDelegateUsers>
</logonParam>
</XML>
</WebMessage>
</WebMessageTable>
</WebMessageTables>
Step 6:(Modifying the instanceconfig.xml File for Proxy Functionality)
You can modify the Oracle BI Presentation Services configuration file (instanceconfig.xml) to specify the following information for proxy functionality:
in the <TemplateMessageName> elements: The name of the custom message template in the Custom Messages folder (The default name is LogonParamSQLTemplate)
in the <MaxValues> elements: The maximum number of target users to be listed in the User box in the Act As dialog box. If the number of target users for a proxy user exceeds this value, an edit box, where the proxy user can type the ID of a target user, is rendered rather than a drop-down list of target users. The default is 200.
in the <MaxValues> elements: The maximum number of target users to be listed in the User box in the Act As dialog box. If the number of target users for a proxy user exceeds this value, an edit box, where the proxy user can type the ID of a target user, is rendered rather than a drop-down list of target users. The default is 200.
For example between the <ServerInstance> node, you can insert:
<LogonParam>
<TemplateMessageName>LogonParamSQLTemplate</TemplateMessageName>
<MaxValues>100</MaxValues>
</LogonParam>
<TemplateMessageName>LogonParamSQLTemplate</TemplateMessageName>
<MaxValues>100</MaxValues>
</LogonParam>
The name that you specify in the <TemplateMessageName> element must match the name that you specify in the <WebMessage> element in the custom message file
Step 7- Setting Privileges
Login with weblogic or admin user and set the proxy privilege as shown below

Now the user should be able to act as the users (PROXY_TARGET_ID)


Till Next Time.
Sandeep
1 comments:
I really appreciate this blog and I will sure promote this blog to others in my circle.
access Bomb-mp3 in UK
Post a Comment